Sunday, August 12, 2007

First Ever Singapore Built Split Bamboo Rod

The Birth Of The Singapore LeoRod Number One
These pictures were taken way back on 11th June 2006, when Uncle Wong still had some hair on his head. I had promised Uncle Wong and CY that I'll keep these photos from my blog until they had completed the project and the bamboo rod is catching Peacock Basses. Uncle Wong named his creation "The LeoRod" and had already written the Story of the LeoRod in another article in this blog.

These pictures had remained in my computer until today, when Ady requested me to put them on my blog and with CY's and Uncle Wong's permission, I proudly present The Historic Moments of The Splitting of the First Bamboo Fly Rod in Singapore.

The LeoRod Is Born.
(Click on the pictures for more.)

Wednesday, July 25, 2007

Laiquendi ar Moriquendi salque: The Elven and Drow

Laiquendi ar Moriquendi salque: The Elven and Drow Elf Wands
by maker Jeffrey L. Hatton, Chief Gnome and a true Noldori Deep Elf


Aiya Meldor ( Hail Friends),

This Rod Story is special because it is a culmination of 2 years of creative, heartwarming and truly wonderful correspondences with maker Jeff Hatton. As a mark of deep respect for his work, I have chosen to use elvish (Quenya) for parts of this story and to discribe some of the rods’ qualities but first here is a poem abstracted in part from Tolkien about the impression viewing the works that just arrived today:

La quettar ner caitane celusse ar ondo
Eresse Cale Anarp ar Elen ar Istil
Ar certar tureva i andonna
Tanome hyelere, marilla, hyelondo marya


No words were laid on stream or stone
Only the light of sun and star and moon
And runes of power upon the door
There beryl, pearl and opal pale

… May 2005, I contacted maker Jeff Hatton regarding his amazingly ancient looking yet modern performance rods and wanted to know whether he would consider making an ‘elven rod’ themed after Tolkien’s Lord Of The Rings for me. JRR Tolkien shared the same birthdate with me and I studied him for a thesis. I expected Jeff to brush me off as childish and probably half crazy but instead, ‘ Elen sila lumen omentielvo’ a star shone at the hour of our meeting… Jeff replied that he was great fan of Tolkien and would love to make an elven rod for Michelle inspired by the gold green Mallorn tree of Lothlorien and the beloved Olvar (Flora) of the Green Elves (Laiquendi) of Belleriad who were protectors of forests. The rod will have details of green malachite and feature the leaves of the fabled Mallorn. Months passed as Jeff laboured on the hardware and ideas. In the meantime, we had established increasingly deeper friendship, with me ordering his Book specially signed for my daughter Ashley, and learning about his devotion to rodcrafting and care of his elderly parents. We also realized that we shared passion for Celtic Arts, the early Arts & Crafts movement, semi-precious gems and of course both of us loved pure unadulterated imagination. The wand was to express total freedom of imagination made possible by Tolkien and will be totally unique depending on the artist’s interpretation.

A year later, the Elven Wand was almost ready when disaster struck and the varnish did not set well. It was back to the bench for patient Jeff, building a new ‘cleanroom cave’ to keep out ‘gremlins’ and rethinking his elven rod design as usual. But by that time, Jeff had shown me his ‘Beast of Bolo’ and so many ideas and images were swimming in my mind that I had to order another wand to partner Michelle’s… so in that moment of inspiration both us dreamt up the Drow/Dark Elf theme (Moriquendi). So connected were we in imagination and in aesthetics that before we knew it, we were speaking each other’s thoughts about ebony mortise, moonstones, lightning opal and mother of pearl!

Another half year later Jeff was experimenting with elaborate hardware and engraving and came up with the exceptional ‘Phillipe’ Grade rod. I was amazed by the carvings but thought that elvish aesthetics was more minimalistic. So, the ever responsive Jeff came up with a refined semi-engraved design I have now taken to name the ‘Mellon’(Friend) Grade. And to make this grade even more unique he invented a simple yet amazingly elegant reel seat design.

So here they are the Elven Wands.. the firstborn a Laiquendi salque ( Greenelven Grass).. a rod tapered after the famous Dickerson 8013, 8’ 2/2 5wt hollowbuilt with snakewood mortise, transparent colombian emerald green silk wraps with black tipping, double intermediate tip& butt section wraps in a style passed down from Murphy, Landman and Divine Fairy rods, the first ever Hatton Swiveling Hood hardware, purple heart formfit carved with wild rose leaf pattern inlaid with malachite culminating with a wild rose that remind Jeff of his hills while it reminded me of my hometown Larut Hills where a similar temperate flower bloomed white and pure among tropical green grass, leather scabbard detailed woodsman style with Malaysian Mahseer (Kelah) scrimshaw on fossilized ivory.

The deeply carved malachite inset leaves glow aquamarine like shady deep pools in the wind and water worn Colorado canyons so loved by Jeff. Right at the apex is a marking of the magic mistarille (mithril or true-silver) inlaid Hollingate at the entrance to Khazaddum. The gems in star pattern glitter. The gate reveals itself in moonlight and to access its secrets you need to speak ‘Friend’ in elvish, thus the ‘Mellon’ Grade. The rod is light, fast, extremely smooth and almost feminine in nature but designed to tame the king of my home tropical forest streams, the golden green Mahseer. Michelle loved the rod at first sight, especially how the swirls of the snakewood begin to come alive in the ornate elven bands and the most unique hook-keeper ever!…She was elated at first cast! Ashley also chose this rod… she noted my description of Divine Fairy details, coupled that information with her present fascination with Barbie and called it her Fairytopia Rod.. quite a funny and magical interpretation by my little girl which I’m sure her Uncle Jeff would approve!

The secondborn.. a Moriquendi salque ( Darkelven Grass), a rod tapered after the impressive Dickerson 6611 4wt that casts 2wt to 5wt with equal aplomb except that it becomes faster action the lighter the line, 6’ 6” 2/2 solid-built with ebony mortise, honey wraps with black tipping, Fairy style double intermediates, original wave pattern Falathrim ( Teleri Sea Elves) design hardware, purple heart formfit with classic salmon fly silhouettes marked out with gems as if this petite rod was made to conquer big leaping fish ( a funny story about the flies framing the ivory plate.. they were fixed upside down as Jeff got too excited by the idea and overlooked the orientation!), matching leather scabbard with Jungle Perch (Sebarau) scrimshaw fossilized ivory plate.
The formfit and rod is dark, mysterious, and the inlayed gems glow and wink in the lights of elen (stars) like it belonged to the slopes of Hemingway’s Kilimanjaro. This rod is capable of casting all tempos and is truly powerful for such a small configuration. Tolkien lore spoke of the ‘imperfect’ Avari or Dark Elves who loved starlight and forests and never went to the Undying Lands. I always found this aspect of the Avari more interesting than the Eldar or High Elves and the rod reflects this aspect perfectly. The rod also represents my darker character very well when I set foot in jungles and transform into a solo machete wielding-bushwhacking ‘hunter’. Hopefully this wand will be little Marcus’ tropical jungle raime (hunting) rod in time.

Both rods feature Fuji SiC single foot guides that seem totally out of this snakeguide infested flyfishing world but understanding Jeff’s obsession with rod history and casting performance, there must be a story behind it and true enough, he revealed that the SiCs were tested on a loom machine that ran 4 million feet of braided steel cables through the guide with nary a scratch! Another interesting twist is that this type of guide design was invented in 1864 predating snake guides! Amazing information. I find the black SiC particular handsome on the Drow wand playing up the ebony while the Elven wand’s fresh green with black tipping somehow played down the guides.

Before Jeff sent over the rods, he experienced separation anxiety and with my blessing shared his work with his best pals casting and generally admiring the rods. His pal Brent Curtice who is a SCOTT pro staff commented that the wand has serious Mojo and that he had never cast a SCOTT or a Sage that would even come close to that rod. Now that is high praise I’m sure Jeff deserves!


One last hug!
I now understand why Jeff had a problem letting go of the rods.. they are one of a kind, his children, his inspiration, a diary of Colorado mountains and waters, and to a great extent embodies his hope that the magical craft of rodmaking will stay alive. I felt teary when I saw his farewell photo and promised to fly the entire Kuan family to Paonia, Colorado one day so that rods and maker will meet again… Michelle said yes, we will do that.


Happy anniversary!
Thanks for the privilege Jeff …Meldomelin heth( Dear Friend-brother in Quenya-Goldogrin).

Arthur, Michelle, Ashley and Marcus Kuan

PS. Jeff also sent me a DVD of a documentary featuring him that was on air all over USA last year and a slide show of his ‘History of Rods’ that travels with his 250 plus ancient and priceless rod collection. The Kuans had a real kick watching these shows and hopefully they will be shared with all in the next Picnic session!

Wednesday, May 9, 2007

Journey of Crafting First Born-in Singapore Bamboo Rod


The long journey began on one day in 2006 when Chee Yung sent me an e-mail message asking me to bid for, and share with him, a batch of hardly used tools for bamboo rod making put up in E-Bay. I obliged and bided with starting value and told myself to drop it if someone was competing for it. It was destined that we ended up with the tools as no one else participated in the bidding other than I. Hence I ended up winning the bid at opening bid price. But there was a problem in shipping because the seller resides in a small place in a certain USA county side and he would only ship to US domestic address by surface delivery. Coincidentally, my all-time fishing buddy, Adi has a daughter residing in San Diego and he was to visit her at the time the bid closed. Adi was kind enough to help receive the shipment while in San Diego and arranged for International shipping through UPS. The cost of shipping the batch of tools alone came to US$580! All my other fishing buddies said I was mad to pay such colossal amount just for shipment.

Upon receipt and inspection, it was found that the bamboo culms that were included in the list were not shipped. A fresh order for grade A+ Tonkin bamboo culms together with some components were placed on an US Supplier. The day the bamboo culms were received, the long journey unfold.

When the Tonkin bamboo arrived, it was discovered that one of the six culms has suffered multiple splits during the shipment. I decided to split this culm first to prevent it from further damage. In the splitting process, the split line ”walked” off course and has to be deliberately corrected to obtain as many good strips as possibly can. Due to this and the culm suffering many splits beforehand, only 16 reasonably good strips were obtained. The nodes were filed, heated slowly and carefully over an alcohol lamp and the bumps and bends painfully straightened.


The first rod I intended to craft is based on Garrision 209 taper. It is a 7-1/2 ft two piece rod. Many people found it good for 4WT line. As I am following the grand master’s footstep, I decided to use his six cylinders internal combustion engine theory of staggering the nodes in arranging the six strips in blank formation. After marking all the strips, six for the butt and another six for the tip, I tied them in bundles to avoid mixing up. When I took out the rough cut planning form made of mild steel, it was rusted pretty badly on the surface. A steel wire thistly brush was first used to remove the rust, and then followed with steel wool to clean up the surface. After that, the form is adjusted to relevant depth plus allowance for shrinkage with the help of a depth gauge.

A Lie Nielsen low angle plan was used to plan the strips to rough cut dimensions set in the form. Most strips came off the culm uneven. Some strips are broad at one end and thin at the others while some have thin sections at several places along the length. Much effort was spent on the strips to plan them to near-isosceles triangular shape in cross section. In the process of planning, the enamel side was left untouched. This process took long time to complete as only a few thousandth of an inch would be removed at a time. It could not be accelerated or else that would leave a “lift” in the strip. If the lift is bad, the strip has to be scraped.

When all the strips were planned, I faced with a new challenge. As the tools I received did not include a heat treatment oven, I need to construct one. Tapping my engineering experience and asked around for sources, I purchased a section of 78 inches long 3” diameter stainless steel pipe and have a cape welded to one end. I also got the welder to construct a cap for the opening end. The outer surface was wrapped with 2” wide 1/16” thick fiberglass insulation material left behind in my previous project long time ago. Aluminum wire mesh was cut, joined and inserted into the tube to serve as separation between the heating element and bamboo compartments. An industrial standard electrical heating element of 72” and a thermostat control unit were purchased. But a new problem evolved. How to support the heating element and thermostat sensor in the tube? If they were left lying on the bottom of the tube, the electrical heating element would come into contact with the stainless steel wall and short circuit the electric loop. Electric insulated heat withstanding material must be used. Mica came to mind but where to get such material? This haunted me for a few weeks until one day my son, who is studying civil engineering mentioned to me to use clay. Clay use by sculptors to form art pieces was bought, neaten to form blocks with recess conform to heating element, and holes to run thermo sensor and high temperature resistance electric cables. When the clay blocks were sufficiently dry and everything assembled, I thought I had it but horrible thing happened!

When the oven was fired up the first time, I wanted to feel the heat on one exposed part of the outer surface by hand. I almost got electrocuted. This caused the circuit breaker in my house to trip and black out the entire house! I have checked the circuit with an electrical multimeter before power it up and there was no connection between electrical loop and the metallic shell. Why electrical charge was collected on the shell?! I couldn’t believe it! I checked the circuit again and again to ascertain no contact between the electrical loop and the outer shell yet it tripped the system a few minutes after it was switched on every time. This kept me puzzled for a few weeks and the only theory I could come out was that the cylindrical shape of the tube encasing the cylindrical electrical heating element formed a capacitor. When the shell accumulated sufficient charge, it discharged through the cable that went through it and caused the circuit breaker to trip. It was blessing in disguise that this first design failed as the insulation on the outer shell was way too thin and the two ends were not insulated at all.

I set upon to design a rectangular shape oven and sourced around for a workshop to fabricate the same. I asked around shops in likely places that I knew and someone referred me to a shop. When I presented my drawings to them and stated that I wanted the material to be 3 mm stainless steel sheet, the saleslady warned me it would be expensive as prices of stainless steel has went through the roof of late. It has always been my philosophy to obtain highest quality for things I intend to acquire. I also know that good things don’t come cheap. Hence I bit the bullet and went with stainless steel. Before the oven was fabricated, I also sourced around for 1” thickness heat insulation material. Through my years of engineering experience, I found a company located in Tuas that deals with rock wool and fibreglass insulation materials. Sample was sent and that was exactly what I wanted. However, the company only sells the Rockwool insulation sheets in a bale of 12 and they do not deliver. I had to buy the whole bale although I only needed 2 sheets and I had to drive to Tuas to collect it myself. When the shells were completed, I faced another problem. I designed the oven to have a length of 78” so that I can craft one-piece 6ft rod in the future. The shells were too long to fit into my car! I had to engage the help of Billy Teo who drove his minibus to collect the oven together with me. Even then, he had to fold down two rows of seat in order to accommodate the oven shells. Stuffing heat insulating material between the inner and outer shell required the muscle of two men. When it was finally assembled, I took a deep breath and down a large jug of icy cold water!

After installing the heating element and thermostat controller, I was looking for temperature indicator. Most indicators sold in the market required holes to be drilled in the inner as well as outer shell to insert the sensor into the oven cavity and cable running along the length of the oven. I held back the temptation to buy an indicator with digital reading and came across a non-contact infrared digital thermometer at reasonable price. Now that I have everything assembled and ready but I was a bit hesitant to fire it up upon completion. If it failed again, my investment of over $1500 will go down the drain. I procrastinated for a week or two until one day I decided to give it a go. To make assurance doubly sure, I took a step to cut down the risk of tripping by connecting one long cable between the outer shell and an iron pipe in my garden to provide grounding for the unit. It was great relief when the electrical system was not tripped after 10 minutes of switching on the circuit. I knew I had a beautiful working oven on hand.


The six strips for the butt section and another six for the tip were bound together with cotton cord using Garrison binding outfit. The oven was pre-fired to required temperature that was confirmed with the handheld thermometer. The two sections were placed in the oven for 5 minutes then withdrawn from the oven quickly, turned around end to end and reinserted into the oven for another 5 minutes. Turning the ends around was to make sure that the heat treatment is done as evenly as possible. After the sections were taken out and let to cool, they showed apparent sign of shrinkage as moisture has been driven out of the strips.

The planning form made of mild steel that came in the package was rusty and dirt also gathered in the grooves. I gave it a thorough workover by removing all the bolts, cleaned them, greased them before putting them back in place. The two halves of the form body was scrapped with steel wire thistle brush, sanding with 400/600 grit sand paper and cleaned with steel wool to restore its shine.

Then the required taper was set into the form using depth gauge with an accuracy of 0.0005”. The planning of strips into required taper took a long time for several reasons. 1, only 0.003”~0.001” thickness shaving were removed from one face of the strip on each stroke of the plane. The planning was done on alternate faces upon completion of each stroke on one face. 2, the enamel is difficult to remove and the flattening of uneven enamel side is a delicate process. 3, the bamboo strips hardened somewhat after heat treatment. Frequent grinding of the plane’s blade was needed. 4, the running direction of the fibre around node made it necessary to plan certain strip in opposite directions at specific locations. 5, the strips needed to be measured with micrometer after every other stroke of the plane to ensure no over-cut of dimensions. I bought a high accuracy micrometer with reading of 0.00001” locally for this purpose. 6, have to cure my itch making fishing trips to Indonesian and Maldives waters. Last but not lest, I had to dropped everything to attend to my sick parents’ needs every now and then.

Before constructing the oven, I also bought Epon epoxy glue from an USA supplier who sold it to people making laminated wooden strips that turn into bow for archery. Well, I think if Epon is good for bow, it will be good for bamboo rod. Another good feature of Epon is that it has long working time allowing ample time to glue the two sections before the glue is set. To try out the glue, I spliced several pieces of bamboo strips that were cut off from those that were used for the two sections. I intended to use the two strips obtained from glued up pieces to fill the shortfall for the spare tip I would be making in the future. Unfortunately, the oven was not ready for use then. This resulted in the lack of strength in the glued line on one strip. I had to re-glued and tempered-cure to attain better strength this particular strip after the oven was up running.

The planned- to-taper strips were cleaned thoroughly with alcohol. The gluing and binding process was straight forward. The straightening of strips to take out twists and turn in strips to get both sections to as straight as possible took some efforts and time. I was glad I chose Epon that gave me ample time to work on the sections in this aspect. Phew!!

The glued up butt and tip sections were let to set overnight. The cord that was used to bind the sections was removed, remaining glue on the sections cleaned. The sections were bound again, let to dry for 24 hours and heated in oven to cure the Epon glue for added strength. Then the cord was removed, remaining glue scrapped, bends straightened using a professional heat gun purchased locally and smoothened with fine grit sand paper. A thin layer of tung oil was applied to the surfaces after they were cleaned. Voila, two sections of blonde bamboo blanks showing grains of fibre were born. I hung the two sections up for the tung oil to dry while making a trip to Hainan Island with two golfing friends and our wives.

Before I went on my trip to Hainan Island, I placed order on an US supplier for a Bellinger NS uplocking reel seat with burl maple wood insert, a set of supper Swiss NS ferrules, a natural stone colour agate striper guide and a bottle of camellia oil. The supplier delayed the shipment and compensated me with a NS hexagonal winding check that fits nicely on my rod. Upon receipt of the components, I glued up 12 pieces of cork rings left over from my previous project, together with a cork ring with recess for the hood in reel seat that came with it. The glued up handle was shaped on my wood lathe to semi full-well contour with rather large diameter to fit my big hand.

When the tung oil was sufficiently dried, I cut the blanks on locations where ferrules are to fix and turned the ferrule stations to size on lathe. The ferrules were feathered on the lathe, then by hand with sand paper to make smooth and gradual transition from bamboo to NS barrels. Slow cure epoxy was mixed and inserted into the ferrules as well as spreaded on the bamboo. Ferules were fitted on the bamboo blanks and forced against the floor to drive out the extra epoxy and air pockets. When the glue was set, the blanks were rolled by hand as well as in a spine catcher to ascertain the spine and so marked. The tip section was cut to length and tip top fitted. The cork handle was fitted and glued onto the butt section, again with slow cure epoxy. Then the reel seat was glued in multiple stages according to the marked spine. When the glue was set, I realized that the supplier who sold me the components forgot to ship the sliding ring for the reel seat. I wrote to them to request for the ring and a new butt cap. In the final stage, I had to use fire to burn the old butt cap to loosen up the epoxy glue in order to pull it out. The slide ring was inserted and new butt cap re-glued to complete the whole assembly.

Before I embarked on this project, I already acquired a set of snake guides making tool together with several sections of spring wire. I made up a dozen snake guides to different sizes, picked 8 to make a set for the rod. The feet of stripper and snake guides were ground to make gradual transition for the thread to mount. Guide positions were marked on the blanks and guides wrapped on with size A silk threads. I decided on scarlet wrappings tip with black beforehand. On the butt section, initially I wrapped the section just in front of the winding check without a hook keeper. Then I decided to include one with some signature wraps. I made a hook keeper by hand and re-wrapped the section with the hook keeper and added on the signature wraps.

Before I began the wrapping, I designed a dip tank head with o-ring seal and screw holes to adapt a cap to seal up the tank. I took the design to a machine shop and asked them to machine the setup out of solid stainless steel block. Again, it cost a fair bit as prices for stainless steel already shot through the roof! I also bought two end caps and 3/8” ball valves each and gave them to the machinist to make up a connector so that the vales could be mounted at the bottom of the tank to drain the content. Meantime, I bought a 54” long section of stainless steel pipe of 2” diameter and cleaned the internal walls with caustic solution. I gave the pipe, the head and the end cap with connector for ball valve to a welding shop to weld them together to form a tank. The welder did a good job not only welded the joints professionally, he also polished the external to shining finish. Chee Yung said it look like part of a nuclear installation when he first saw it.

When the dip tank came back to me, I installed the ball valve, bolted up the cap and injected compress air to test for leakage. It was air-tight! The internal wall was further cleaned with acid and caustic solution, then flushed with running water. It was left under sun to drive out the moisture. A structure made of galvanized steel and aluminum angle bars was constructed to hold the dip tank. Guide rails fitted above the tank to allow a block made with rollers and hooks to glide up and down just above the tank. When this structure was competed and dip tank installed, it look like a rocket launcher. I name it the Discovery Launch Pad!

Three cans of marine varnish (1 litre each) were purchased and I decided to use it as it was without thinning it down. The tank almost took all 3 litres. The surfaces of both sections were wiped clean with thinner and then blown dry with compress air to make sure no particles were left on them. The tip section was first dipped into the tank and withdrawn at snail speed with the help of a variable speed motor/gear box driving mechanism, stainless steel cable, pulley and guide block. Strips of blotching paper were pocked into the guides as they came out from the varnish. The butt section was dipped until the front end of the handle barely touched the varnish. Both sections were hung in a totally enclosed wooden drying cabinet. I have a wooden cabinet constructed for previous project but its height was not enough for the longer sections. I had to extend the height in order to accommodate the new sections. The internal was vacuumed to get rid of dust prior to the dipping process.


The two sections were taken out of the drying cabinet for inspection three days later. The thick varnish caused some bumps at some locations. These were leveled with fine grit sand paper and touched up with thinned-down varnish. One week later, the vanish surface were buffed with rotten stone powder. The buffing brought out some shine in matt finish and the rod looked just perfect. There and then, the first crafted in Singapore bamboo rod was born. I name it LeoRod.


Tuesday, April 24, 2007

My One and Only Sebarau


Suddenly, the rod jolted and took a deeper bend than usual. This fish was definitely much bigger than the others thus far.........

An account of my first experience with feisty Sebarau.


To read more....... http://alfiesflyfishing.blogspot.com/

Tuesday, March 13, 2007

Abu Dhabi Beckons All Ye Fly Fishers!


Discover saltwater fly fishing at the desert edge. I am now in Abu Dhabi having a great time with salties here. Join me on at a fishing hole I found in the city that's great fun!

Alberto's Journey

Here is a guy whose fantastic fly fishing journey take him round the world.

Alberto Chan.

Read more about him http://flyfishingsg.proboards38.com/index.cgi?action=display&board=FreshWater&thread=1115257533&page=25

Fly Fishing New Zealand 3


This is the final installment of my New Zealand adventures. More like a photo journal actually.....

.......the views are fantastic and breathtaking.


....Read More...>...>...http://alfiesflyfishing.blogspot.com/2007/03/photos-of-past-new-zealand-forays.html

Monday, March 5, 2007

Fly Fishing New Zealand 2

It has been quite a while since my last post, no thanks to two and a half weeks of reservist duty.

Where did I last stop?.....OK… Early next morning, at 7 am (that’s 2 am S’pore time) I looked out of the window and saw a dreary, misty sight. It was low clouds and misty and damp!

I had spent the night before sorting out my fly boxes, flies, and re-checking the bag (I had driven 2 hrs to a river once before a found out I had brought a reel loaded with 4 wt line when I had with me a 6 wt rod).

“Hell if I’m going to waste the morning just because it looked like horrible,sleep in weather in the city!” I had to psyched myself up for the day ahead.

It was around 15 °C that morning. I drove to Denny’s for breakfast as I pondered my options for the day.
1) I could drive north of Christchurch to the Hurunui River that I never had any luck in, or
2) Drive south to that river that Mike recommended…now what was that name again??

I looked at the road map when I got back to the car. There were two rivers that started with ‘O’ – the Opahu and the Orari. They were both around the same area.. so confusing!.......I decided to just drive south, taking my chance with the weather and to check out the two rivers anyway.

Driving down on Highway 1, the weather was coming in waves of low clouds and drizzle with radio weather forecasts for rain in the Canterbury region. Pressing on, I drove past the town of Ashburton on towards Rangitata for the next one and a half hours before taking Highway 79 towards the mountains. (see this site for map of Central South Island of New Zealand and its numerous rivers http://www.nzfishing.com/FishingWaters/CentralSouthIsland/CSIRegion/CSICentralSouthIslandregion.htm)
After almost 2 hours of driving, I crossed the Orari River. It looked more like a stream and access from the bridge didn’t look very promising, so onward I drove. After 20 minutes or so, I came across a bridge with a sign that said ‘Opahu River Bridge’. I immediately took the first turn off and went down the dirt road that lead to the river.

There was already a campervan parked by the river so I thought that I might have to go further downstream in case they were fishing – there is certain fishing etiquette to adhere to in these parts. However, I stopped the car and went up to the folks in the campervan and asked if they were fishing, just in case. Good thing I thought to ask because they were just parked there overnight and were moving on southward. It was already about 11:15 am by then and I didn’t waste any time getting into my waders and gearing up.

The weather was still overcast with an upstream wind blowing. I stood at the waters edge and started to fish with a two nymph rig of my 4 wt rod. The river looked very appealing until the nymphs I was fishing started to catch on to the bottom. I pulled in my flies and saw that the nymphs were covered in algae. This happened on every drift and was very frustrating. I moved upstream on the riverside to the bottom of the bridge and tried some of the holes there but no luck. Moving further upstream, I spent almost an hour fruitlessly nymphing the water and removing scum from the flies.

Sidenote: On my entry into New Zealand, I was given a leaflet informing visitors of the Didymo problem that the country is currently fighting. Basically, Didymo is an alga that is foreign to New Zealand and is choking up numerous water ways. More information can be found at http://www.biosecurity.govt.nz/didymo . By all descriptions, the algae in the Opahu River didn’t look like Didymo, but better that I didn’t step into the water. Moving back to the car, fishless, I pondered my next course of action.

The map showed that I wasn’t too far from the famous Lake Takepo. There is good lake fishing at Takepo, but I was more interested in river fishing. I didn’t have much information on the rivers in the Mackenzie region that Lake Takepo is located in as I didn’t intend to come down so far south. But seeing how the weather was looking, me fishless, and that it was only going to be another hour drive, I pressed on.

As I passed through Burkes Pass into the Mackenzie basin, the sky opened up and the clouds disappeared. The mountain range behind me held up the low clouds and before me was clear blue sky! This was looking good! Beautiful!


Driving into the Mackenzie Basin


After another 20 minutes driving, I reached Lake Takepo. I stopped at a hotel to ask for directions for the river or the nearest fishing spot. After some vague directions from the girl at the reception counter, (She wasn’t even a Kiwi!) I drove out of town and found my way to the river. What a sight and relief to see this lovely blue river before me! It was braided in some parts and had a series of nice runs, best of all, I saw some guys fishing! I drove further downstream and got ready to fish.


Driving past Lake Takepo and passing the canal from Hydro dam


It was still as windy, if not more. I opted to fish my 6 wt to best battle the wind.

Stepping cautiously into the river, I checked a couple of rocks to see what kind of insect life was around and found some mayfly and caddis nymphs. I tied on a size 14 yellow Humpy and on a short dropper, a size 16 Pheasant Tail Nymph (PTN). Starting at the head of a run, I began casting in the water nearest to me. Slowly moving toward the middle of the river, I spotted a dark torpedo shape on the opposite bank. It looked very much like a trout about a foot long.

“Could it be a trout?” I wondered. The shape was not moving and was tight against the bank in only 20 cm of water. I tried a few exploratory casts in front of the ‘fish’ – no reaction! The wind was blowing upstream from my right to left and there was fast moving water between the target and me. Trying to cast to a target only 15 -18 ft in front of you with 12ft of leader and 3ft of fly line out of the rod tip, PLUS the wind – it’s pretty difficult! Working hard to fight the wind and drag, I tried to get in a couple of casts to the fish, but still no reaction. Getting bolder, I moved closer and cast again. Distracted by the wind and uneven stones beneath my feet, I overshot the cast and the nymph got tangled in some roots at the waters edge. By that time I was sure that all my efforts had been wasted on a piece of wood.

I was just in reach of the fly to untangle it when the ‘dead’ piece of wood came alive and bolted into the fast water just two meters below me. The broken water must have distorted my silhouette as the fish didn’t swim away. But in my excitement, I put in a few lousy presentations that finally spooked the fish downstream. Bloody stupid of me! Well, at least I knew that this river held fish!


The River - check out the clarity!


With a renewed sense of purpose, I scanned the waters upstream through the Polaroids and started to work my way up. Clean, clear water is great for stalking fish, but if you can see the fish, the fish can also see you. After one and a half hours, almost 1 km and another spooked fish later, I was really starting to doubt if I was really cut out for this kind of fishing. I eventually worked my way up the river till I could see the other fishermen I had seen on my way in earlier.
I moved out of the water to pass by them and waved a ‘hello’. I noticed that of the two gentlemen, one was nymphing with a fly rod, and the other was spinning with a minnow lure. Not more than 30m after I had walked past the two men did I heard a shout. Turning around, I saw the fly fisherman’s rod in a deep bend and he was trying to gain control of his fly line. Moving closer, I watched him fight the fish until his rod suddenly bounce back, pointing straight up to the sky.

“What happened?” I asked. The man with the spinning rod explained that his friend had lost the fish, a nice one, around an underwater boulder. I inquired if they fished here often and if there were any good fish in this river. He told me that his friend had caught and released three fish already and that this river was quite dependable for trout. I thanked the man and wished him good day.

“Three fish!! And I bet they weren’t there very long!” I cursed to myself. Well, local knowledge helps I guess. By now I was about 1.5 km from where I parked my car. I decided that I would fish the same stretch of river once more – downstream. I backtracked away from the river giving those guys space to fish walking parallel to the river for a few hundred meters before heading to the water. This time I shortened the leader to 9 feet and tied on a size 14 Beadhead Hare and Copper and a size 16 PTN at the point.

Starting at the head of a riffle, I began to try and systematically cover the water by casting down and across then taking a step downstream before doing the same cast again. It was already 4:30 pm and bright and sunny. By 5 pm and 50 m down river, I was beginning to pray for fish -- 3 separate outings to 2 major rivers in New Zealand, and yet, no famous big NZ trout.

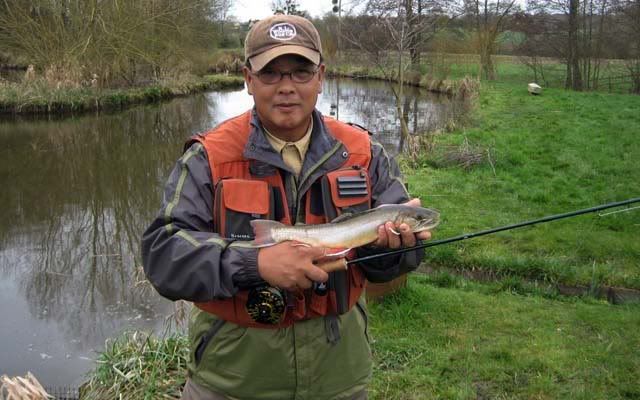
Finally, casting to drift my nymphs in front of a mid stream submerged boulder, the flies stopped. Thinking that they were caught up on a stone, I lifted the rod and felt that indeed they were attached to the riverbed. Putting more back pressure to the rod, I suddenly felt a pulse in the line and ‘riverbed’ started to swim off downstream! I immediately lifted the rod to 45 degrees and a put a nice arc in my 6 wt rod. Keeping my rod tip high and stripping in line, I could feel the fish using the current of the river to its advantage. The fish showed itself to be a rainbow trout about 40 cm long with all its fins fully erect, creating a much drag as it could. Using side strain and trying not to give line to the fish, I reeled up the slack line to fight the fish off the reel. I slowly walked the fish back towards the riverbank and the fish came in quietly… that was until it realized it was in shallow water! The rainbow shot off across and down the river with line slipping through my fingers. Taking into account the line drag in the water plus the line resistance through my fingers, I was trying my darnest not to pop the 5lb tippet I was using. Finally, knees shaking and hands trembling, the rainbow came into view again. With only 10 cm of fly line out of the rod tip, I opted to walk back up the riverbank and ‘walk’ the fish in. As it laid on the sand, I whipped out my camera and fired off a couple of shots (Photos not that good ‘coz hands still shaking).

My prize Beauty!
The rainbow was a little larger than I estimated. About 45cm and 1.5 to 2 kg, it had taken the size 16 PTN. Removing the fly, I picked it up carefully and cradled it in the current. I thought the fish would take a while to recover given the fight, but in 2 seconds it flicked its tail and swam off, disappearing from sight.


Words cannot describe the euphoria and relief as I watched the trout swim off! FINALLY!!, after driving so far, after two fail outings, I can truly say that I caught a noteworthy NZ trout! Not that I didn’t catch anything in my other outings… but to finally hook and land a big trout from a flowing river in such scenic countryside, it’s ….like living a dream!!!


Mission accomplished, I fished the remaining water aimlessly till I reached the car. It was almost 6:30 pm by now and it was time I started making my way back. Good thing summer means late sunsets…..by the time I changed out and packed up it was almost 7 pm. Before I left the river, I stopped to take a few more picture of the whole place while there was still ample sunlight. From the town of Takepo, I drove non stop till I reached Christchurch city, a journey of almost 3 and a half hours.


Thus ends an ‘epic’ journey for me. I’ve fished for trout in Japan, Canada and also the UK, but this outing was by far the most memorable. It has inspired me to delve deeper into the numerous facets of this sport or ‘art’ that we call Fly Fishing. As promised to our friend Billy, I’ll endeavour to contribute whatever two cents worth I can to this blog.

I’ll try to dig up my other photos of New Zealand and post them next time.

Cheers!

Tuesday, February 13, 2007

Fly Fishing New Zealand

By: Alfie


Fly fishing in Singapore is rather limited, or limiting. Opportunities for river or lake fishing are virtually non existent, unless one ventures into Malaysia or another neighbouring country. I’m sure that most fly fishers that get into this sport have at one time or another dream catching a trout or salmon on a fly. So whenever my job takes me somewhere I can catch a salmonid, I make full use of the chance.

February 9th , 2007 sees me landing in Christchurch, New Zealand. It’s mid summer and it’s trout season. I’ve been to Christchurch on numerous occasions and have caught some small rainbow before but nothing big. This time I was determined to get me a decent fish! New Zealand as we all know is famous for trout – BIG TROUT. Though the trout are not always available in huge numbers in the rivers, the number of trophy fish that can be caught are. My trip would only see me get a day and a half of fishing and the weather on arrival wasn’t at all great. It was overcast with drizzle and intermittent rain. Can’t complain right?

Undeterred, I sorted out the car rental the moment I stepped into the hotel room and went out to get the car. At NZ $69 a day, it wasn’t so bad considering it was Friday and during peak season. Then, it was off to Mike’s Fishing Tackle in the city to buy my fishing license for the next two days and of course, to find out where the current hot spots were. As usual, Mike was very helpful and laid out my options for rivers that were within 2 hours drive of Christchurch. There are many streams and rivers near the city and some of course had good runs of salmon, sea run trout, browns and rainbows….. Decisions…decisions!
What flies were the fish taking? Big bushy dries or small nymphs were the order of the week. A Size 14 or 12 Humpy with a small size 16 nymph tied to the bend of the dry would pretty much would do the job. As some of the runs in the rivers are quite deep, a twin nymph rig would be required. It was a good thing I tied a couple of Bead Head Hare n Coppers plus some Pheasant Tail Nymphs the afternoon of the day of my flight.

After everything was settled, it was almost 3:30 pm and I decided to go somewhere close by to fish the rest of the afternoon. Back to the hotel to grab all the gear and off I went.

The Waimakariri River (or the Waimak as the locals call it) is just on the outskirts of Christchurch. It is a big braided river that has salmon runs at its mouth. The river itself was too big for me to fish comfortably, and it’s mostly that light blue colouration with fine silt… I’d tried to fish it once…. not for me. So I ended up in the South Branch of the Waimak. This is a tributary that looks like a spring fed river/stream, I’m not sure. It has several pools, some quite deep and it runs through mostly paddocks.
There are, however, several points of access to the river as marked out by NZ Fish and Game signs. One has to contend with curious cows that sometimes come too close for comfort.

This time I used another point of access that I had not tried before. Walking through the paddocks, I got disoriented for awhile before I eventually made it to the stream. It was choked full of weed and I was a little disappointed to say the least.
“But what the heck, having trudged all the way here, might as well give it a shot”, I consoled myself.

So I rigged up my 4 wt and a 9 ft tapered 4X leader and tied on a size 14 Bead Head Pheasant Tail Nymph (PTN) and a size 14 PTN. The wind

was blowing pretty strong in my face and the whole rig was quite a handful (Fishing for Peacocks is so much less complicating). I was getting hung up in the weeds (as you can see in the photos) on nearly every drift. Trying to get a drift in the lane between the weeds was not an easy affair. After 4 or 5 drifts, the nymphs got stuck and I lost the tippet with the two flies. ShXX! And it was starting to rain! After 45 minutes of fruitless efforts, I went back to the car and tried another spot downstream where I had some luck on a previous trip – ZERO, ZIP... NADDA!

So, Day 1 ended with me - 0, fish and all the elements – 1.
Tomorrow, well, that's another story .................

Friday, February 2, 2007

Before Bamboo..


All right, one has to purge all sins before retreating into the pure black bamboo grove of Guan-Yin.. or so I think .

In this spirit, I will divulge 4 lessons via three and a (significant) half tales that have nothing to do with purist flyfishing views but plenty to do with the love of fishing. Got to get our fundamentals right!

Tall-tale Uno – Learning from Master Loh

Despite the present generous spare tire around my waist, I used to pound the pavements around the Taiping Lake Gardens in my salad days. Everyone, including my school’s headmaster thought I was a great sportsman, and assumed I was cross-country training during those ungodly pre-dawn hours. Unbeknownst to all, I was running from fishing spot to fishing spot searching for Master Loh.

The Master was probably in his 40’s when I first knew him. He was the town railway stationmaster. He always had two Abu rods rigged up with matching Abu eggbeaters. In the carrier basket of his Honda Cub was usually a clear plastic bag with a few geckos and a Brylcream container of nightcrawlers. I would wait patiently a few rod lengths away while he parked among the trees, remove his skull coloured helmet, grunt a greeting and begin setting up his gear. He would first rig up his float tackle with a chopped worm bait. This rig will be cast just a few feet away near the bank and left undisturbed. Then he would prepare his gecko bait by giving the creature a few sharp raps and impaling it with a mean-looking two inch hook weighted with coils of wire. The bait would be tightly secured with rubber bands and cast smoothly to the nearest banks and then the opposite bank. Each cast was measured for effect. It had to produce a ‘plop’ like a creature diving from the bank to attract feeding Haruans and also, according to the Master, produce a ‘scent trail’.

He somehow caught plenty of fish everyday, every time, even in seemingly barren waters. The little red/white foam float will emit rings of vibrations on the mirror surface of the lake before finally going under and viola! a sebbie, belida , terubol, lampam or tilapia. The slapping gecko would hook up Haruan and even the occasional Marbled Goby. He never spoke much but through observation it was clear that he totally believed in his tackle and the fact that fish do go hungry. Coupled with a smooth bait delivery style, he took fish from touching distance.

We anglers tend to get too technical, get worried and loose instinct along the way. I learnt from the Master that fish never run and hide all the time and can even be tempted to take after feeding hours. It only takes quiet persistence. The first few years I fished with a license (instead of poaching) at the Lakes I still carried that glow of confidence he left in me. Armed with just a mauled Abu spoon, I would haul in many haruan for grandma to cook porridge. I believed in that spoon!

Translated to flyfishing, I believe in my tackle from canerod to fly even though the total strength of the set-up is only a 4lb tippet. The best fishing is always when I cast with confidence and many cases fish were taken just a few feet away!


Tall-tale Duo – Feeling for fish

Fish are hard to catch. We complain that hooking those fishy mouths are way too tough. In those teenage days doing tough things seem so important and so a few of us rebels took this challenge a notch higher by going hand-fishing in the streams. Armed with snorkels and goggles, we would start downriver and slowly wade upstream. Schools of tengas and seluang will be spotted and they would suddenly disappear in a deep hole or a rocky patch. We would then use our fingers to slowly feel under rocks and ledges. Fish are cornered in this situation and will usually remain absolutely still until cupped in our hands. Woe is the unlucky one who grabbed at catfish. I did it once and thank goodness the spines just missed my palm.

We caught more than just fish this way and picked up observation skills of aquatic life under the rocks normally hidden from view. We also saw more local species than one would normal notice while fishing. The mysterious Kenderap was one ‘shark-like’ fish we found at the rapids that blew everyone’s imagination away.

In flyfishing, we literally turn over rocks and are sensitive to the 'hatches' whether insect, finned, annelidean or crustacean. Even growth of weeds and flowering of bankside trees become fascinating.


Tall-tale Trio – Time and Tide

Michelle and I used to camp overnight at Ubin at the jetty beside the quarry facing the Ketam straits. There were two concrete jetties located in parallel there but one had finally collapsed. We used to hook loads of sembilang ( catfish eel) from those spots and could never figure out where the other fish species went. So one session I started charting the types of bites at different locations around the jetty, times and tides, and noticed that the sembilang only occurred when currents were slow and hits from snappers, gelama and barra only occurred when the current was running 2 hours into or after high tide. The big hits were actually occurring at the collapsed jetty pylons just a few meters away and not out in the straits where the ‘grass seem greener’.

Armed with this information, we made a calculated trip to the spot one weekend and found our camping spot at the jetty taken by a bunch of army boys. They had buckets of life prawns and plenty of gear but had caught nothing. I told them to stay up to 2.00am and watch for action. Come 2.00am, the tide was running strong and I drifted a lugworm bait into the pylons… wham! The rod bent double and line was cutting through the water dragged by a very mad golden snapper. The boys’ mouths dropped and I was really pleased. I believed in my tackle, knew where fish disappeared to, knew time and tide.

In flyfishing terms, this niche of knowledge is called 'reading the water'. It is not surprising that many experienced fly anglers do not stomp into a new spot and flay away but spend some time understanding the water before dropping a fly.


The Other Half

Many anglers face pressure from their significant other to stop fishing and spend more time shopping and more dough on shoes. I’m no different but I’m armed with a special story that keeps me fishing while shopping.

My first ever blind date was actually followed up with a quick plan to go fishing and camping together at the very spot in Ubin mentioned. My date and I arrived there one Saturday evening whereby it started to drizzle and light was fading quickly. I was out to impress but was faced with a real washout! To my surprise my date seem unfazed and quickly helped me set up camp. Then, armed with a torch light each, we scoured among the lalang for firewood. We took more than an hour and garnered only damp sticks and a fallen Albissia trunk. I started a small fire using scraps of newsprint and both of us slowly piled on the small sticks and gradually the larger pieces. There was smoke everywhere but not a squeak of complaint or expression of doubt came from my date. Soon, smoke melted into fire and we had a blazing conflagration. In the now bright light I saw a face, a smile, and I saw pride and hope. As if to celebrate the spark the Albissia started to catch fire and pop like fireworks! Amazing coincidence.

We caught fish that night but that was beside the point since my date during that fishing trip was Michelle and we have been building our little fires of hope ever since… This is why I always consider myself to be on a fishing trip even while gazing at yet another pair of shoes. Metaphorically speaking, I married my biggest catch!

Fishing and it follows that flyfishing is both a solitary and shared sport. Solitary because it is an intense dancing duel between you and the fish. Strangely 'shared' because the experience only takes on meaning in the telling of it between friends and loved ones. Having a slightly warped mind that takes every random occurance as 'meaningful' or even godsent is also a great way for one to maintain interest in flyfishing. Once the various 'meanings' are entwined with one's passions, flyfishing becomes a steady fire without need for much kindling.


There it is, all I know about fishing in a few paragraphs. Not much in the eyes of more experienced practitioners but something to share with people who do not know what angling is about. My flyfishing years are only moments in this lifetime in pursuit of the finned ones. We are getting close to bamboo now…

Happy fishing until the next tale!

Thursday, January 25, 2007

PM To Young : Help Make Singpore Better

The Straits Times, September 24, 2006

"If I say I don't like this, I'm fed up, let's go, I think that's a great pity. We would have lost somebody in whom we've put a lot of hope, and I think Singapore will be worse off."

"But if we say this is not good, I'm going to make a nuisance of myself until I fix it, that's different. Then I think there's hope for Singapore. You stand your ground and you make it better."

"What is it you are unhappy with, let's get that changed....... You must have the optimal degree of unhappiness - just right, and the conviction to make a change."

Wednesday, January 24, 2007

Bamboo Rods and Fly-fishing: An Introduction

Bamboo Rods and Fly-fishing : An Introduction

Arthur Kuan Chee Yung
January 2007

Forest-fringed water, fish, fishing, flyfishing and bamboo fly rod is, to me, the perfect order of nature, and a worldview that leads to the present cane rod obsession. I believe one never can learn how to appreciate canerods, it is just a manifestation of your roots, values and hopes for the future.

My roots are in Taiping, a colonial town nestled delicately in the Larut valley. Every morning I’d breeze through the Lake Gardens, the liquid heart of the valley, in a rusty 60 year old Griffon bike, rushing past ancient raintrees with boughs forming gothic arches that sprout from buttress roots, stretching over the garden’s ring road and dipping gracefully into the lake itself. Islands of bamboo groves nestle within the gardens against a backdrop of green hills. Hills rise to a thousand feet with cool refreshing waterfalls crashing down over granite hillsides. Bamboo grows there too, beside the hill’s pocketwater. Brandishing a machete, I’d fell culms for my various woodsman-crafting projects. The bamboo tips, stripped of leaves and hung to dry, converted into long whippy fishing rods to float crumbs, size 16 hook and unweighted line into darkwater pockets where rasboras and tengas flit playfully. The lightning quick silver denizens are hard to catch but when hooked would fight so desperately that their delicate transparent mouths bled. I felt sorry for hooking them but was addicted to the take. Fishing is not the perfect way to connect with the nature of fish and rivers but it is the best. Not that I’ve not tried goggling downstream, floating like a lazy log and immersing into the watery world of fish, shrimp and the odd freshwater crab. I gave up because my senses were overwhelmed by river, the fish were out of reach and no one believed the crabs.

It is diffiicult to communicate observations of nature that seem so important but are frequently ignored by others. So it is with the salient points of fly-fishing and tackle. The reason for catch and release fishing is tough enough to explain but liking bamboo rods is even harder to make sense of. Why bamboo? Why limit oneself to slower action tackle that need more care and that is more expensive? The price of bamboo is about twice that of good graphite but pure monetary value is certainly not the issue nor worth any bragging rights. The real reason for the paying this price is the same as getting broke buying a diamond engagement ring. It is the price of experiencing love in craftsmanship, in nature, in my roots and my past. A good modern bamboo rod is a work that is always created at a loss. As every artist knows, selling our craft is like removing a pound of flesh. It is a product that is the labor of calm passion, created after some 60 hours of delicate work. In some strange way, the high value is also translated to the fish as the ritual of fishing becomes more than just catching fish. It is an investment in a lifestyle that suggests a future in Eden, with leaves of green and flowing clear water.

Unlike almost every useful tool in life that is turning into either metal or plastic, a bamboo rod suggests an alternative way of life. The incredible natural strength of the cane power-fibers prove that with some crafting, natural products can perform incredible feats of casting line and playing fish. Every cane rod is different like every fish we catch. Every cane rod is also every bit as tough and as delicate as fish. Understand a cane rod and the nature of fish becomes clear. It is not possible to understand and respect fish if we only want to muscle it in and display it. My best experience with a fish is when it comes to my hand, calm but bright with life, to be unhooked, admired and released to leap another day. The fish is not prey but a dancing partner in this cycle of life.

As an object for the future, the bamboo rod encapsulates my hope that my family and friends will see some method in my madness, some beauty in my obsession and be encouraged to experience it all with me. Fishing cane rods with my bride is about sharing love and nature together. Passing down prized cane rods to my children is an act of handing down memory.

The following ‘rod stories’ chronicle my journey into the world of cane rods, my pleasant encounters with poetic makers and lovers of cane alike. Enjoy…
 

Fly Fishing Club Singapore